Quickstart
⚠️ Forking the boilerplate repo is a great starting point for your project to integrate Self. It contains a basic working example that demonstrates how to integrate Self. From this, you can add your own logic/requirements as needed.
Before You Start
New to Self Protocol? We highly recommend watching our ETHGlobal Buenos Aires Workshop first. This essential workshop walks through the core concepts and provides a hands-on introduction to building with Self.
Examples
Working examples of Self Protocol integration are available to use as a foundation to build upon.
Choose Your Verification Path
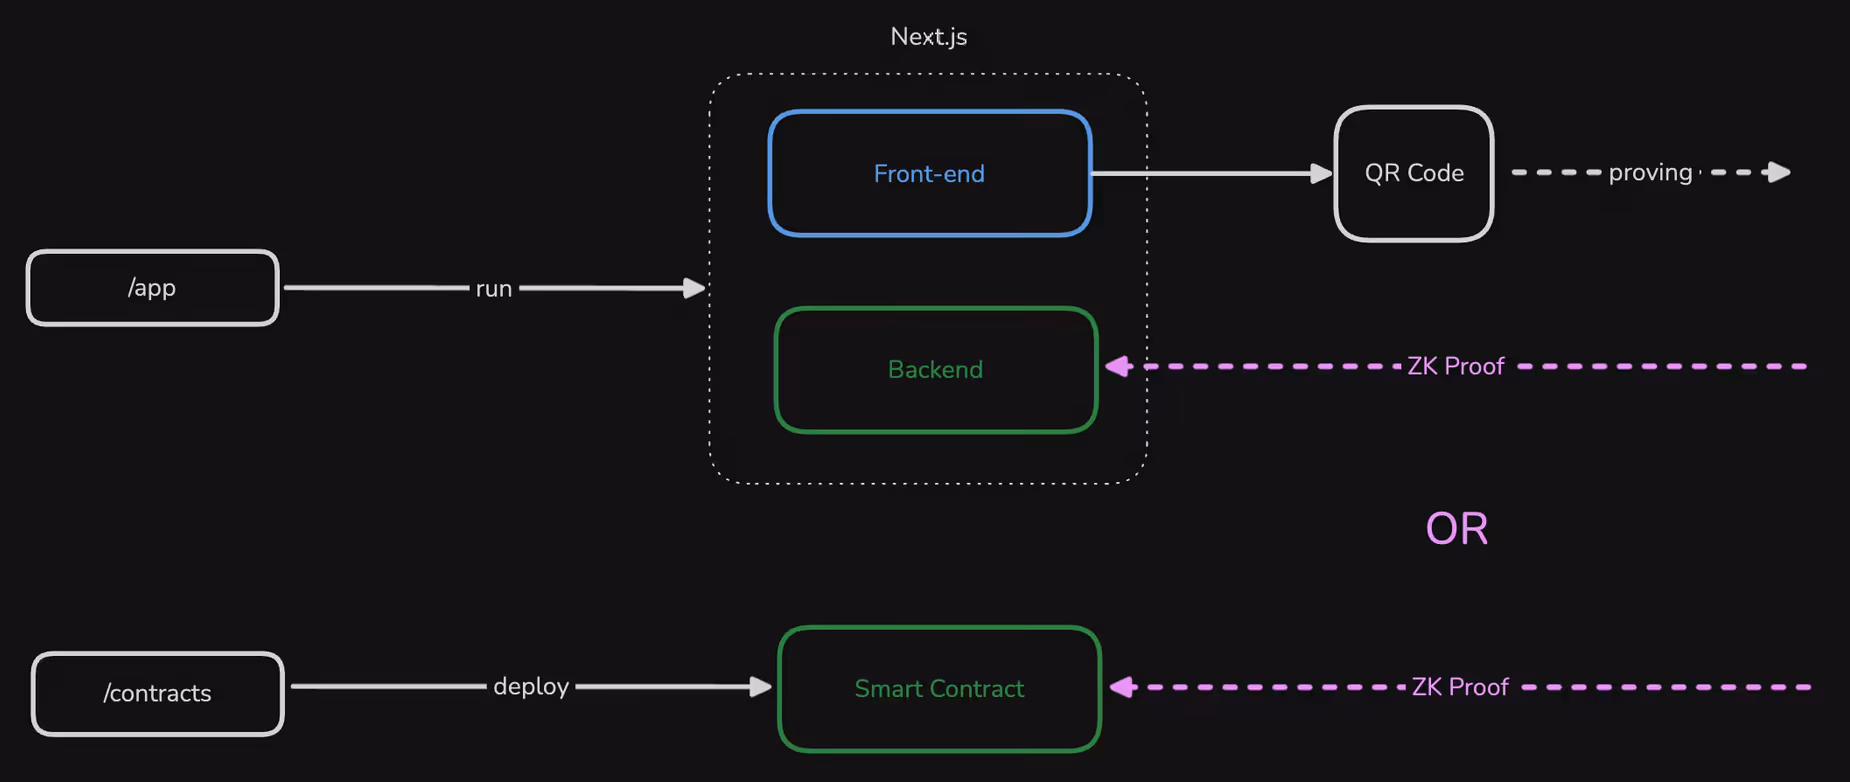
Every Self Pass integration has two parts: a frontend that displays a QR code (or deeplink) for users to scan with the Self app, and a verification method that checks the proof. You must choose one verification method:
| Smart Contract Verification | Backend Verification | |
|---|---|---|
| How it works | Proof is verified on-chain by the IdentityVerificationHub | Proof is verified on your Node.js server using SelfBackendVerifier |
| Trust model | Trustless — anyone can verify the result on-chain | Trust assumption — users trust your backend verifies correctly |
| Best for | DeFi, airdrops, token gates, on-chain access control | Web apps, APIs, off-chain services, rapid iteration |
| Trade-offs | Gas costs per verification; config changes require redeployment | No gas costs; easier to update; requires a running server |
| Guide | Smart Contract Integration | Backend Integration |
| Example | Boilerplate repo | Backend branch |
Choose Your Environment
| Environment | Documents | Network | endpointType | When to use |
|---|---|---|---|---|
| Staging | Mock passports | Celo Sepolia | staging_celo (contract) or staging_https (backend) | Development and testing |
| Production | Real passports | Celo Mainnet | celo (contract) or https (backend) | Live applications |
Key Concepts
scopeSeed— A short string (max 31 ASCII characters) that uniquely identifies your application, e.g."my-airdrop-app". You pass this into your smart contract constructor asscopeSeed, and it gets hashed together with the contract address (using Poseidon) to produce the finalscope— a uint256 value used in proofs to ensure nullifiers are unique to your app and prevent proof replay. Note: the frontendSelfAppBuildercurrently names this fieldscope, but you are passing in thescopeSeedvalue.endpointType— Determines where the proof is sent and which network is used (see table above).endpoint— The destination address. For contract verification, this is your deployed contract address. For backend verification, this is your API URL.
Overview
Installation
Install the required frontend packages:
npm install @selfxyz/qrcode @selfxyz/core ethersyarn add @selfxyz/qrcode @selfxyz/core ethersbun install @selfxyz/qrcode @selfxyz/core ethersPackage purposes:
@selfxyz/qrcode: QR code generation and display components@selfxyz/core: Core utilities includinggetUniversalLinkfor deeplinksethers: Ethereum utilities for address handling
Basic Usage
Here’s a complete Next.js component example based on the workshop:
'use client';

import React, { useState, useEffect } from 'react';
import { getUniversalLink } from "@selfxyz/core";
import {
  SelfQRcodeWrapper,
  SelfAppBuilder,
  type SelfApp,
} from "@selfxyz/qrcode";
import { ethers } from "ethers";

function VerificationPage() {
  const [selfApp, setSelfApp] = useState<SelfApp | null>(null);
  const [universalLink, setUniversalLink] = useState("");
  const [userId] = useState(ethers.ZeroAddress);

  useEffect(() => {
    try {
      const app = new SelfAppBuilder({
        version: 2,
        appName: process.env.NEXT_PUBLIC_SELF_APP_NAME || "My App",
        scope: process.env.NEXT_PUBLIC_SELF_SCOPE || "my-app",
        endpoint: `${process.env.NEXT_PUBLIC_SELF_ENDPOINT}`,
        logoBase64: "https://i.postimg.cc/mrmVf9hm/self.png",
        userId: userId,
        endpointType: "staging_https",
        userIdType: "hex",
        userDefinedData: "Hello World",
        disclosures: {
          //check the API reference for more disclose attributes!
          minimumAge: 18,
          nationality: true,
          gender: true,
        }
      }).build();

      setSelfApp(app);
      setUniversalLink(getUniversalLink(app));
    } catch (error) {
      console.error("Failed to initialize Self app:", error);
    }
  }, [userId]);

  const handleSuccessfulVerification = () => {
    console.log("Verification successful!");
  };

  return (
    <div className="verification-container">
      <h1>Verify Your Identity</h1>
      <p>Scan this QR code with the Self app</p>

      {selfApp ? (
        <SelfQRcodeWrapper
          selfApp={selfApp}
          onSuccess={handleSuccessfulVerification}
          onError={() => {
            console.error("Error: Failed to verify identity");
          }}
        />
      ) : (
        <div>Loading QR Code...</div>
      )}
    </div>
  );
}

export default VerificationPage;Verification Flow
The QR code component displays the current verification status with an LED indicator and changes its appearance based on the verification state:
- QR Code Display: Component shows QR code for users to scan
- User Scans: User scans with Self app and provides proof
- Verification:
- Onchain Verification: Your smart contract receives the proof and verifies it on the Self VerificationHub contract.
- Backend Verification: Your API endpoint receives and verifies the proof
- Success Callback:
onSuccesscallback is triggered when verification completes
Add SelfBackendVerifier to your backend
If you want to verify your proofs with the backend verifier, then you would implement the following.
Requirements
- Node v16+
Install dependencies
npm install @selfxyz/coreyarn add @selfxyz/corebun install @selfxyz/coreSet Up SelfBackendVerifier
// app/api/verify/route.ts
import { NextResponse } from "next/server";
import { SelfBackendVerifier, AllIds, DefaultConfigStore } from "@selfxyz/core";

// Reuse a single verifier instance
const selfBackendVerifier = new SelfBackendVerifier(
  "my-app", // scope — must match the scope in your frontend SelfAppBuilder
  "https://your-app.com/api/verify", // your backend endpoint
  false, // mockPassport: false = production, true = staging/testnet
  AllIds,
  new DefaultConfigStore({
    minimumAge: 18,
    excludedCountries: ["IRN", "PRK", "RUS", "SYR"],
    ofac: true,
  }),
  "uuid" // userIdentifierType
);

export async function POST(req: Request) {
  try {
    // Extract data from the request
    const { attestationId, proof, publicSignals, userContextData } = await req.json();

    // Verify all required fields are present
    if (!proof || !publicSignals || !attestationId || !userContextData) {
      return NextResponse.json(
        {
          message: "Proof, publicSignals, attestationId and userContextData are required",
        },
        { status: 200 }
      );
    }

    // Verify the proof
    const result = await selfBackendVerifier.verify(
      attestationId,    // Document type (1 = passport, 2 = EU ID card, 3 = Aadhaar, 4 = KYC)
      proof,            // The zero-knowledge proof
      publicSignals,    // Public signals array
      userContextData   // User context data (hex string)
    );

    // Check if verification was successful
    if (result.isValidDetails.isValid) {
      // Verification successful - process the result
      return NextResponse.json({
        status: "success",
        result: true,
        credentialSubject: result.discloseOutput,
      });
    } else {
      // Verification failed
      return NextResponse.json(
        {
          status: "error",
          result: false,
          reason: "Verification failed",
          error_code: "VERIFICATION_FAILED",
          details: result.isValidDetails,
        },
        { status: 200 }
      );
    }
  } catch (error) {
    return NextResponse.json(
      {
        status: "error",
        result: false,
        reason: error instanceof Error ? error.message : "Unknown error",
        error_code: "UNKNOWN_ERROR"
      },
      { status: 200 }
    );
  }
}
Key Points
Configuration Matching
Your frontend and backend configurations must match exactly:
// Backend configuration
const verification_config = {
  excludedCountries: [],
  ofac: false,
  minimumAge: 18,
};

// Frontend configuration (must match)
disclosures: {
  minimumAge: 18,        // Same as backend
  excludedCountries: [], // Same as backend
  ofac: false,           // Same as backend
  // Plus any disclosure fields you want
  nationality: true,
  gender: true,
}
Next Steps
- Disclosures — Full reference for all verification rules and disclosure fields
- Deployed Contracts — Hub addresses for Celo Mainnet and Sepolia
- Using Mock Passports — Test your integration without a real passport
- Troubleshooting — Common errors and solutions