

Key Concepts (Legacy)
# Key Concepts (Legacy)
:::warning[Self Pass is legacy]
**Self Pass is now legacy. New integrations should use [Self Enterprise](/docs/self-enterprise/get-started/quickstart/).** These docs remain for existing integrations. Already on Self Pass? See the [migration guide](/docs/self-enterprise/migration/from-self-pass-sdk/).
:::
## Choose Your Verification Path
Every Self Pass integration has two parts: a **frontend** that displays a QR code (or deeplink) for users to scan with the Self app, and a **verification method** that checks the proof. You must choose one verification method:
| | Smart Contract Verification | Backend Verification |
|---|---|---|
| **How it works** | Proof is verified on-chain by the [IdentityVerificationHub](/docs/self-pass/architecture/verification-hub/) | Proof is verified on your Node.js server using `SelfBackendVerifier` |
| **Trust model** | Trustless — anyone can verify the result on-chain | Trust assumption — users trust your backend verifies correctly |
| **Best for** | DeFi, airdrops, token gates, on-chain access control | Web apps, APIs, off-chain services, rapid iteration |
| **Trade-offs** | Gas costs per verification; config changes require redeployment | No gas costs; easier to update; requires a running server |
| **Guide** | [Smart Contract Integration](/docs/self-pass/contracts/basic-integration/) | [Backend Integration](/docs/self-pass/backend/basic-integration/) |
| **Example** | [Boilerplate repo](https://github.com/selfxyz/self-integration-boilerplate) | [Backend branch](https://github.com/selfxyz/self-integration-boilerplate/tree/backend-verification) |
:::note
Both paths use the same frontend SDK (`@selfxyz/qrcode`) to display the QR code. The only difference is where verification happens.
:::
## Choose Your Environment
| Environment | Documents | Network | `endpointType` | When to use |
|---|---|---|---|---|
| **Staging** | Mock passports | Celo Sepolia | `staging_celo` (contract) or `staging_https` (backend) | Development and testing |
| **Production** | Real passports | Celo Mainnet | `celo` (contract) or `https` (backend) | Live applications |
:::warning
Mock passports only work with staging endpoints on Celo Sepolia. Real passports only work with production endpoints on Celo Mainnet. See [Using Mock Passports](/docs/self-enterprise/guides/using-mock-passports/) for setup instructions.
:::
## Configuration Values
* **`scopeSeed`** — A short string (max 31 ASCII characters) that uniquely identifies your application, e.g. `"my-airdrop-app"`. You pass this into your smart contract constructor as `scopeSeed`, and it gets hashed together with the contract address (using Poseidon) to produce the final `scope` — a uint256 value used in proofs to ensure nullifiers are unique to your app and prevent proof replay. Note: the frontend `SelfAppBuilder` currently names this field `scope`, but you are passing in the `scopeSeed` value.
* **`endpointType`** — Determines where the proof is sent and which network is used (see table above).
* **`endpoint`** — The destination address. For contract verification, this is your deployed contract address. For backend verification, this is your API URL.
## Packages
* `@selfxyz/qrcode`: QR code generation and display components — see [QRCode SDK](/docs/self-pass/frontend/qrcode-sdk/).
* `@selfxyz/core`: Core utilities including `getUniversalLink` for deeplinks, and `SelfBackendVerifier` — see [Backend Integration](/docs/self-pass/backend/basic-integration/).
* `ethers`: Ethereum utilities for address handling.
## Verification Flow
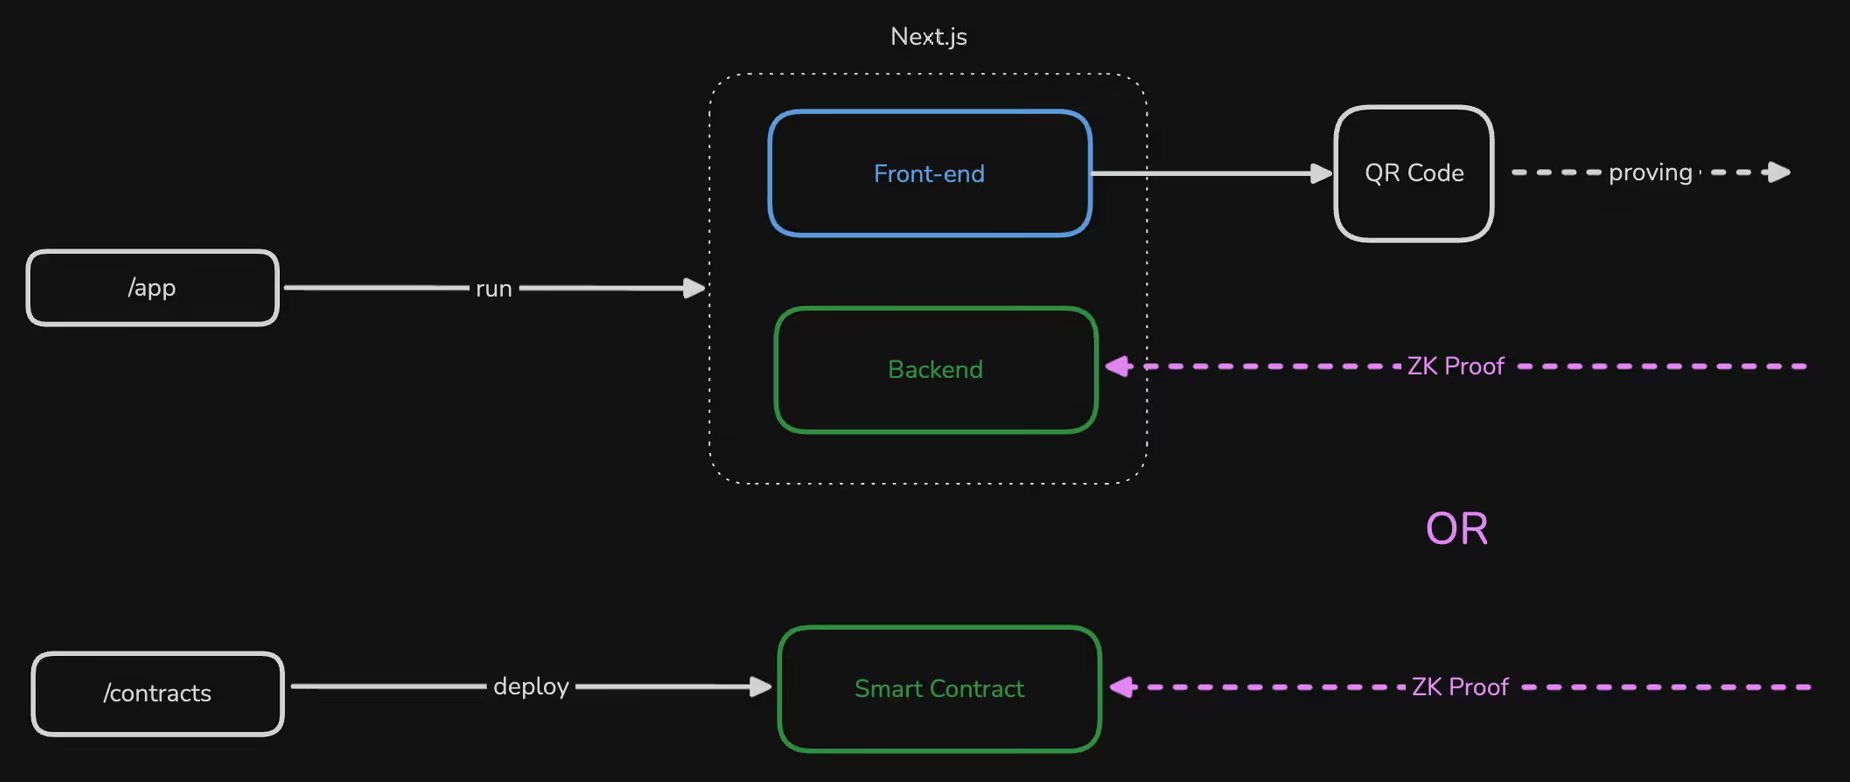
<figure><img loading="lazy" src="/docs/docs-assets/image.avif" alt="Overview diagram of the Self verification flow"><figcaption></figcaption></figure>
The QR code component displays the current verification status with an LED indicator and changes its appearance based on the verification state:
1. **QR Code Display**: Component shows QR code for users to scan
2. **User Scans**: User scans with Self app and provides proof
3. **Verification**:
1. Onchain Verification: Your smart contract receives the proof and verifies it on the Self VerificationHub contract.
2. Backend Verification: Your API endpoint receives and verifies the proof
4. **Success Callback**: `onSuccess` callback is triggered when verification completes
Read https://docs.self.xyz/docs/self-pass/key-concepts.md so I can ask questions about this Self documentation page.
On this page
Choose Your Verification Path
Every Self Pass integration has two parts: a frontend that displays a QR code (or deeplink) for users to scan with the Self app, and a verification method that checks the proof. You must choose one verification method:
| Smart Contract Verification | Backend Verification | |
|---|---|---|
| How it works | Proof is verified on-chain by the IdentityVerificationHub | Proof is verified on your Node.js server using SelfBackendVerifier |
| Trust model | Trustless — anyone can verify the result on-chain | Trust assumption — users trust your backend verifies correctly |
| Best for | DeFi, airdrops, token gates, on-chain access control | Web apps, APIs, off-chain services, rapid iteration |
| Trade-offs | Gas costs per verification; config changes require redeployment | No gas costs; easier to update; requires a running server |
| Guide | Smart Contract Integration | Backend Integration |
| Example | Boilerplate repo | Backend branch |
Choose Your Environment
| Environment | Documents | Network | endpointType | When to use |
|---|---|---|---|---|
| Staging | Mock passports | Celo Sepolia | staging_celo (contract) or staging_https (backend) | Development and testing |
| Production | Real passports | Celo Mainnet | celo (contract) or https (backend) | Live applications |
Configuration Values
scopeSeed— A short string (max 31 ASCII characters) that uniquely identifies your application, e.g."my-airdrop-app". You pass this into your smart contract constructor asscopeSeed, and it gets hashed together with the contract address (using Poseidon) to produce the finalscope— a uint256 value used in proofs to ensure nullifiers are unique to your app and prevent proof replay. Note: the frontendSelfAppBuildercurrently names this fieldscope, but you are passing in thescopeSeedvalue.endpointType— Determines where the proof is sent and which network is used (see table above).endpoint— The destination address. For contract verification, this is your deployed contract address. For backend verification, this is your API URL.
Packages
@selfxyz/qrcode: QR code generation and display components — see QRCode SDK.@selfxyz/core: Core utilities includinggetUniversalLinkfor deeplinks, andSelfBackendVerifier— see Backend Integration.ethers: Ethereum utilities for address handling.
Verification Flow
The QR code component displays the current verification status with an LED indicator and changes its appearance based on the verification state:
- QR Code Display: Component shows QR code for users to scan
- User Scans: User scans with Self app and provides proof
- Verification:
- Onchain Verification: Your smart contract receives the proof and verifies it on the Self VerificationHub contract.
- Backend Verification: Your API endpoint receives and verifies the proof
- Success Callback:
onSuccesscallback is triggered when verification completes
Was this page helpful?
Thanks — what went wrong?
Thanks for your feedback!